

The Round-Trip: How I Push Code Into Figma Using Claude Code
Push code into Figma using Claude Code. How to let your agent read your production code (globals.css, tailwind.config.js) and push it into Figma as tokens + components

How to Push Your Design System From Code Into Figma (what breaks & how to fix)
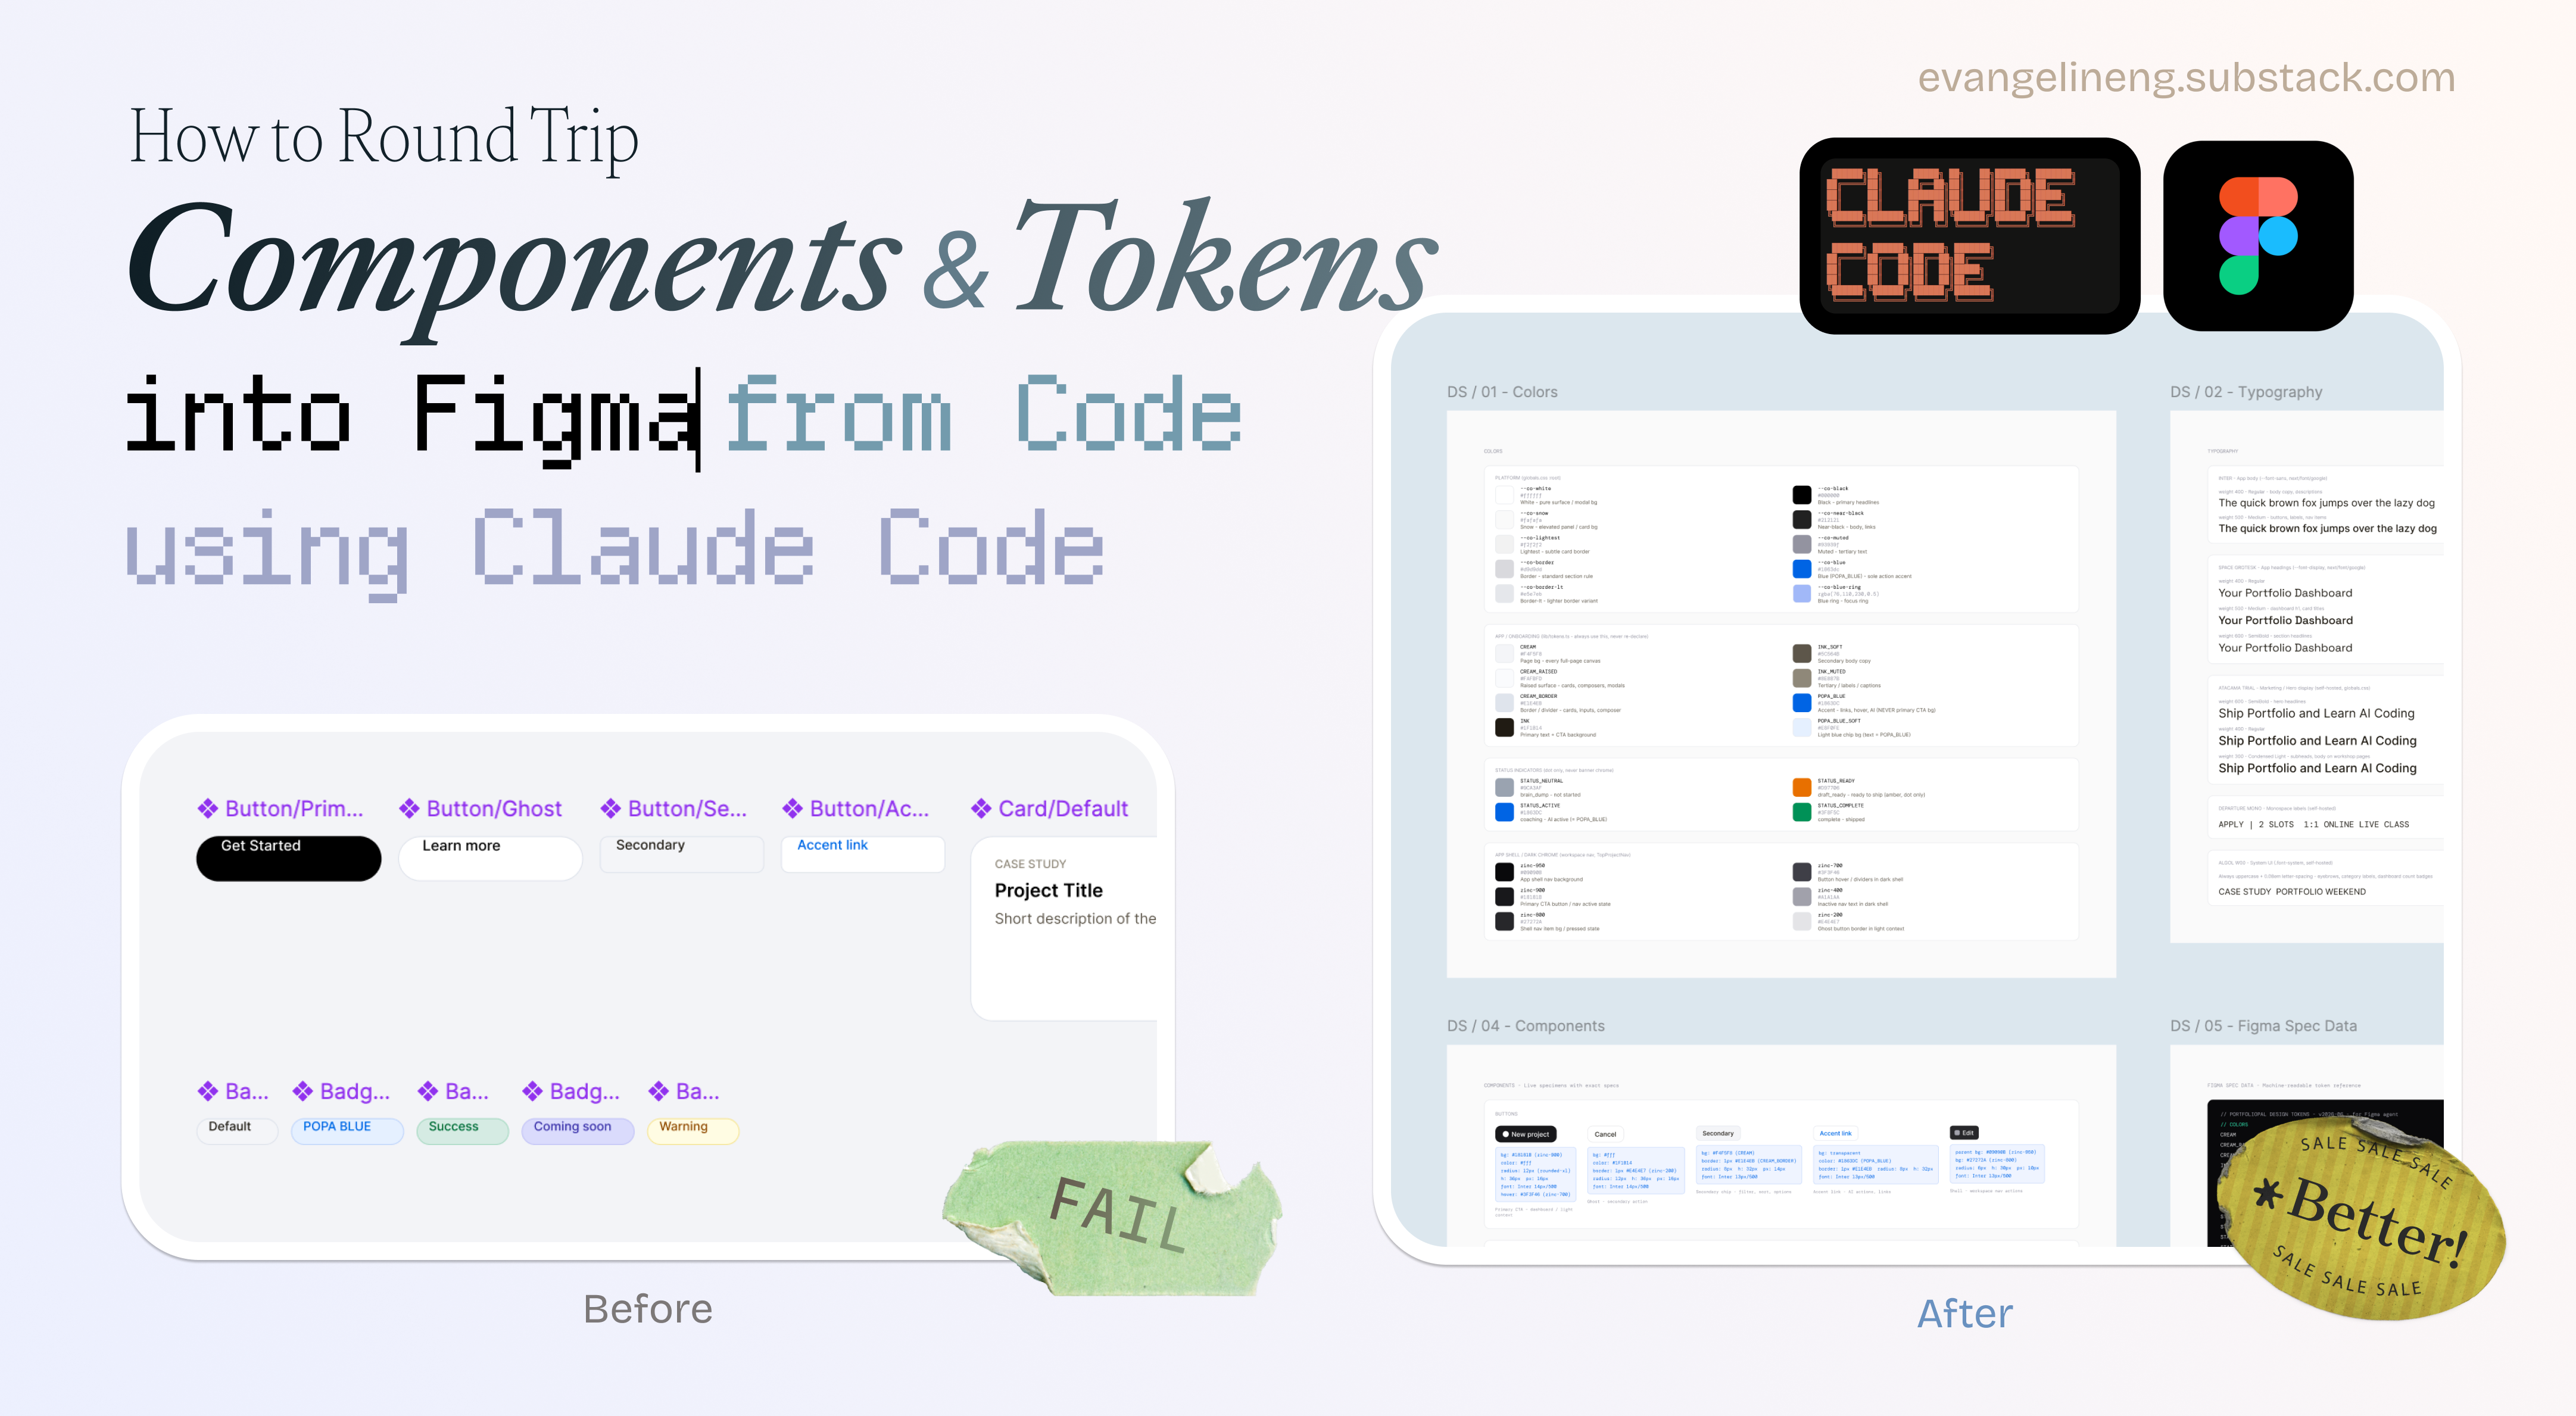
My design system in my codebase wasn’t 1:1 with my designs on Figma.
Things break and it’s incredibly annoying that design and code still doesn’t match up in the little details. A token renamed in globals.css. A new badge variant added in JSX but never made it to Figma. A color, icon or button that exists in Figma but not in the AI generated designs. (vice versa)
This was my first try, it sucks.
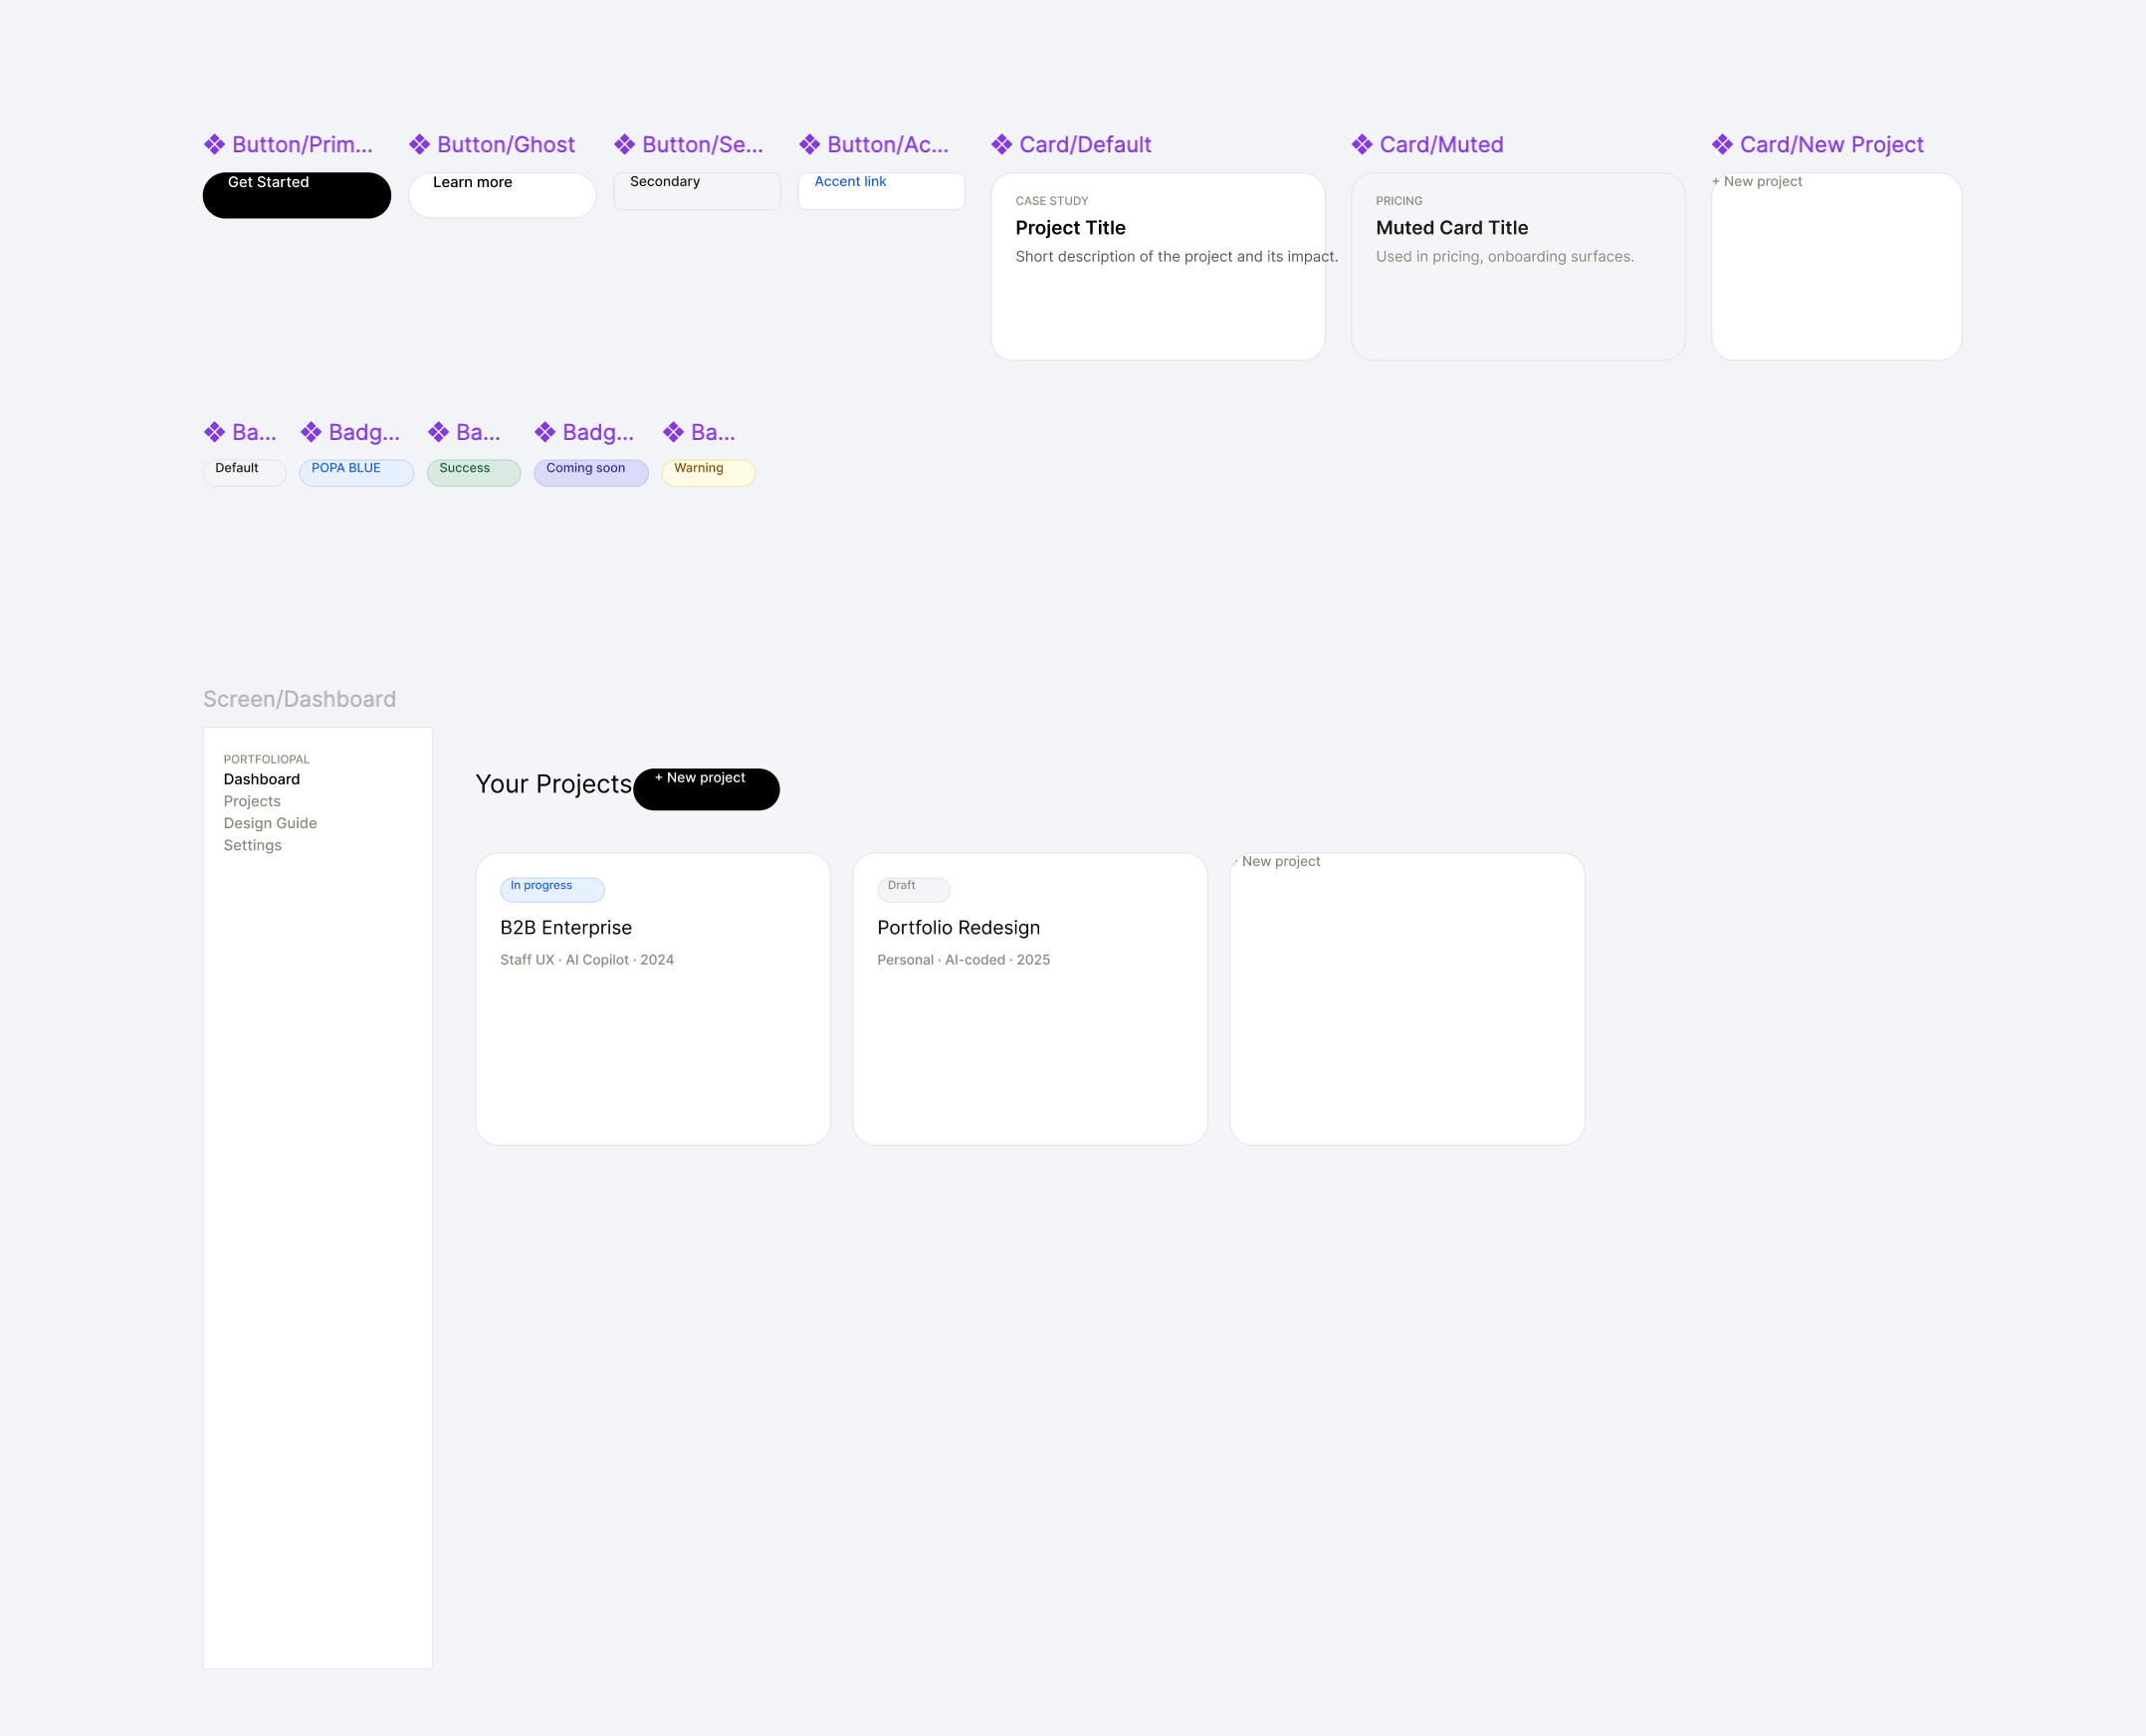
When an AI tries to use my tokens, it guesses, and gets it wrong during my own experiment. In Romina’s article, I learned that I missed out on two things.
1. Technical fixes size limit, the crashing label phrases, the punctuation in names. These fixed why frames were empty.
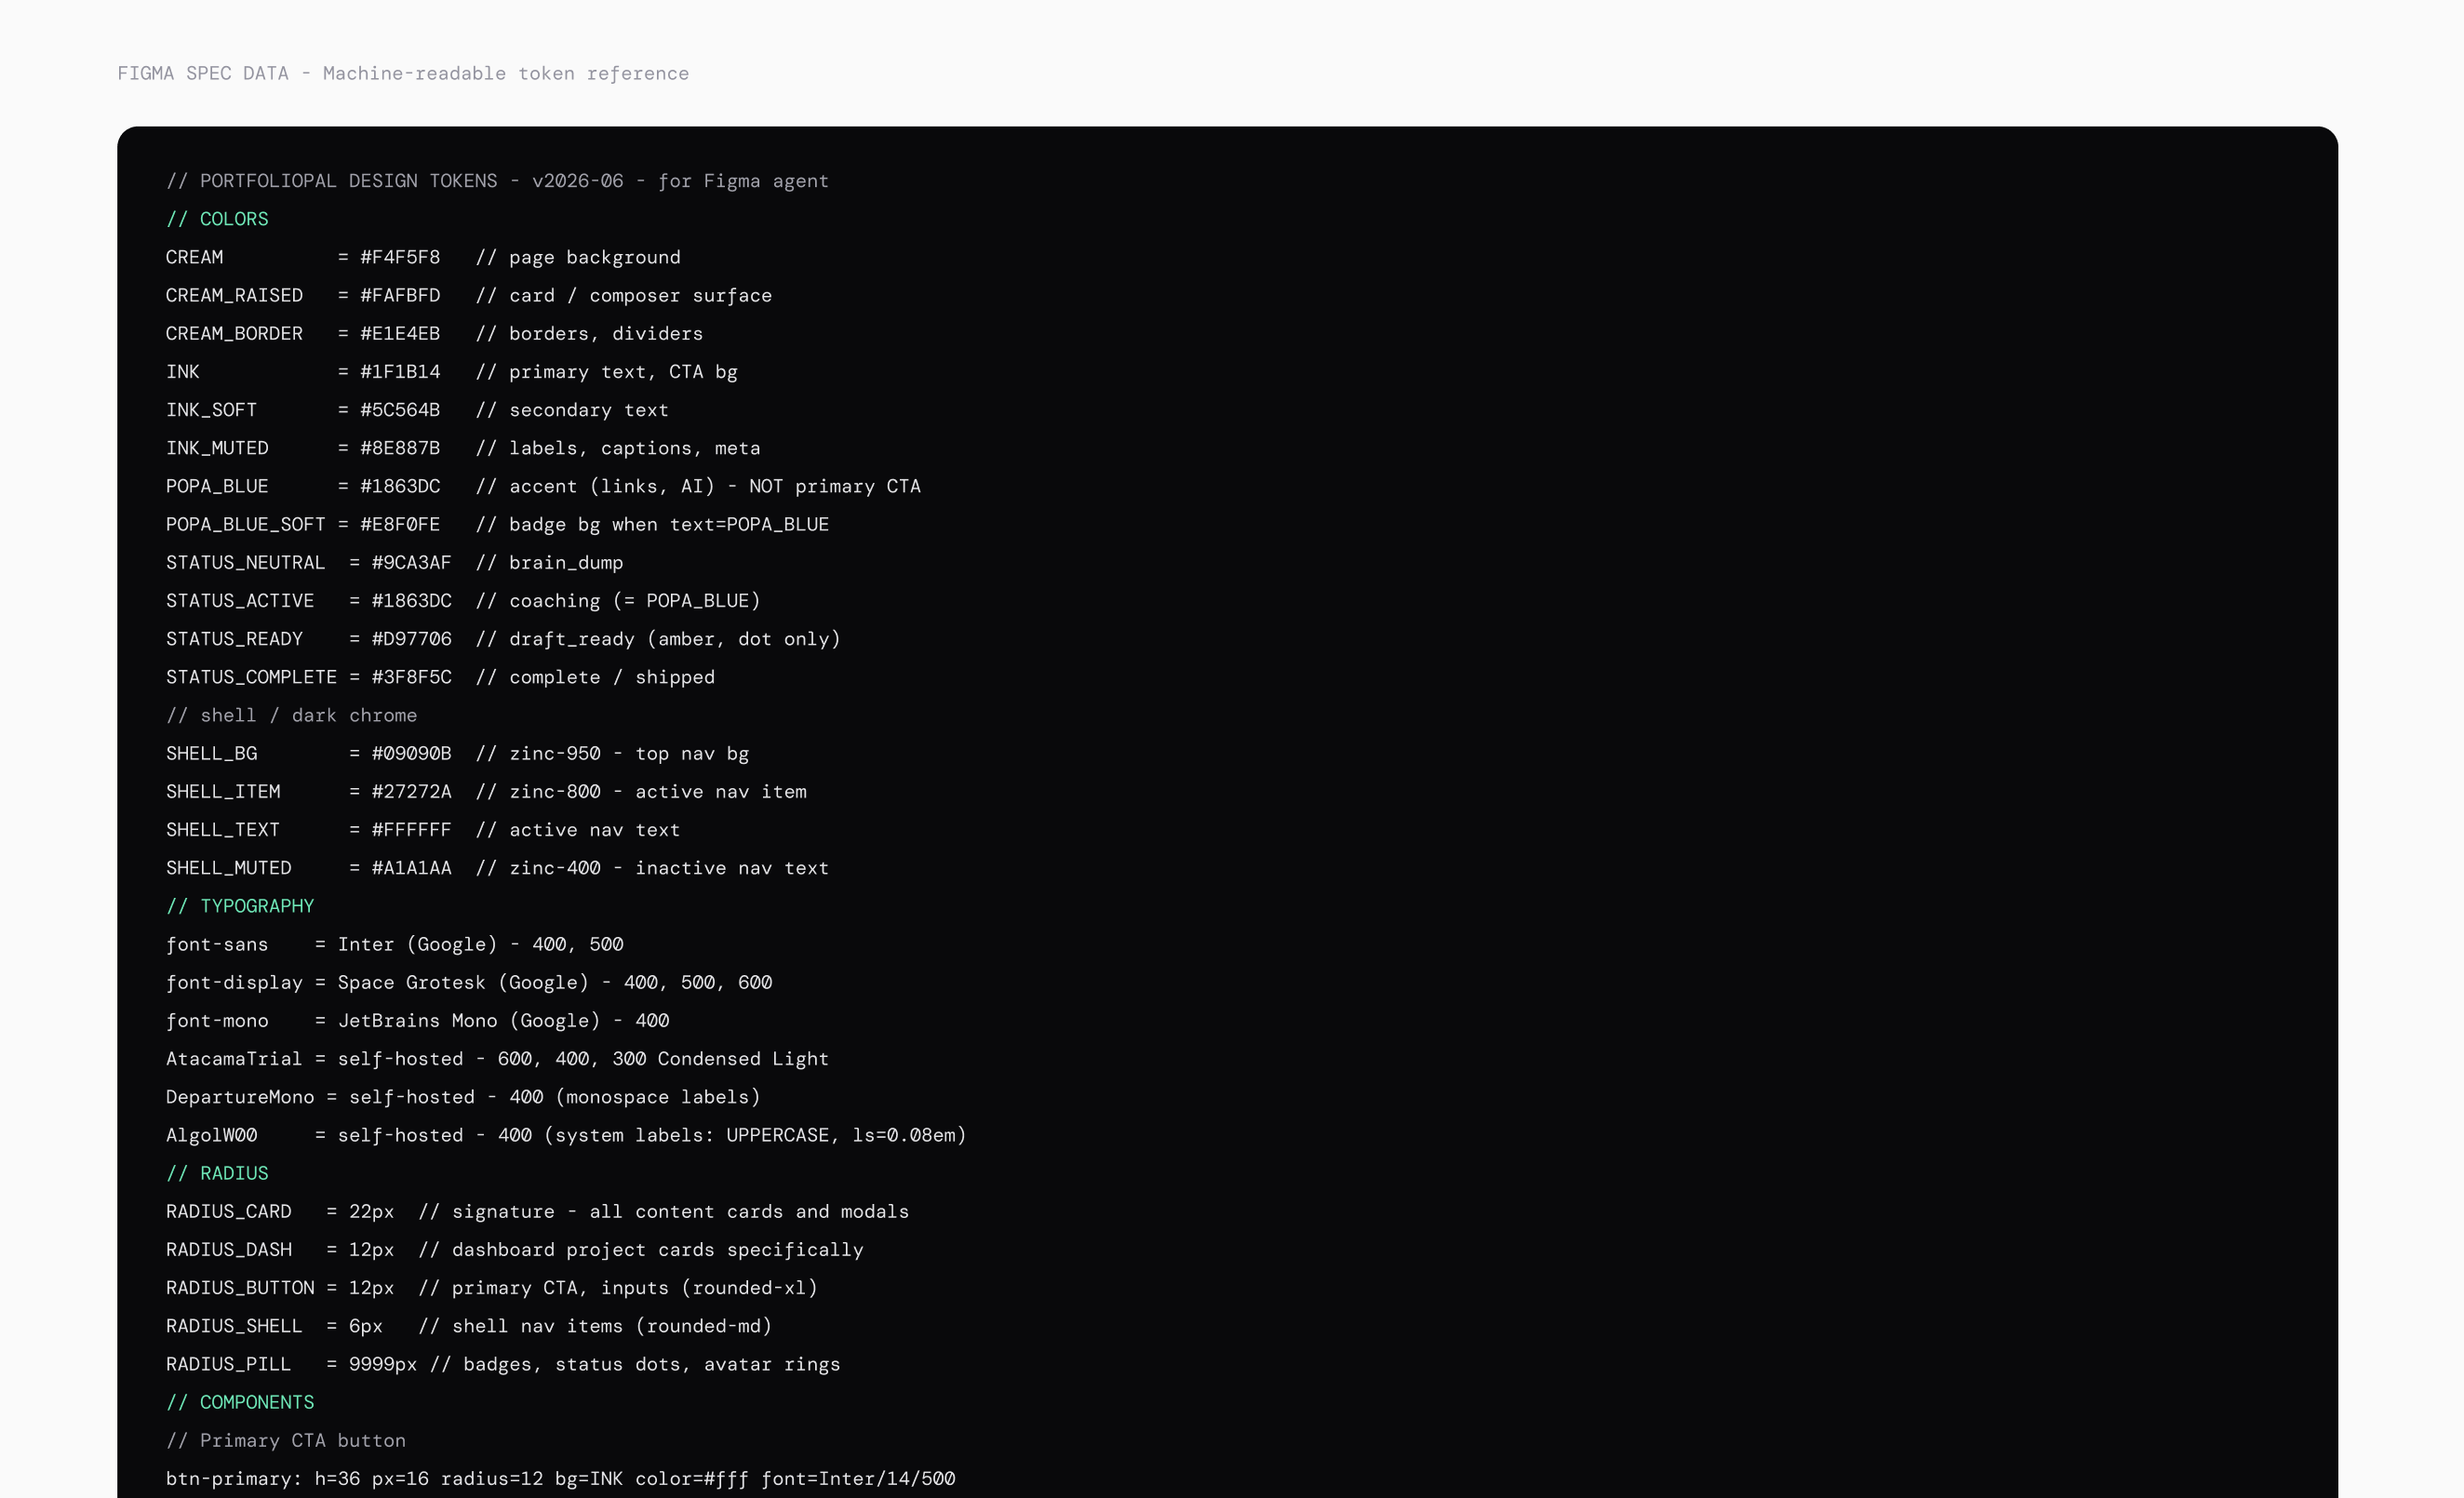
2. Semantic gap adding meaning, rules, and intent to the tokens themselves. This is why the content of the frames is actually useful and correct. (agent-ready token descriptions (grammar.md), before/after token example showing what DTCG annotation looks like, and Figma Spec Data)
TLDR Here’s how I fixed it:
Built tokens/tokens.dtcg.json with $description and doNotUse fields on every token
Wrote a tokens/grammar.md declaring the naming conventions explicitly
Added a DS/05 (the usage rules section) to the Figma file — the red banned-patterns callout, the CTA rules, the POPA_BLUE accent rules.
The Result
What “round-trip” means
The standard mental model for design-to-dev is one-directional: design in Figma, hand off to engineers, they build it in code. Figma is the source of truth.
That model breaks down when you’re building with AI. Code moves faster than design. By the time I’ve finished a session in Cursor, I’ve added three new component variants that don’t exist anywhere in my Figma file. The source of truth has quietly shifted.
A round-trip means going the other direction: code → Figma. Reading what already exists in your codebase and pushing it into Figma as a living design system.
So I used this tool figma-cli, it’s a simple CLI tool that lets Claude Code talk directly to your Figma desktop app via CDP (Chrome DevTools Protocol). No cloud API. No Figma MCP rate limits. Your local Figma, treated like a live interface.
Here’s what my very first session looked like
I opened Claude Code, connected figma-cli, and gave one instruction: read my design tokens and components, then build them in Figma.
What happened next looked like this:
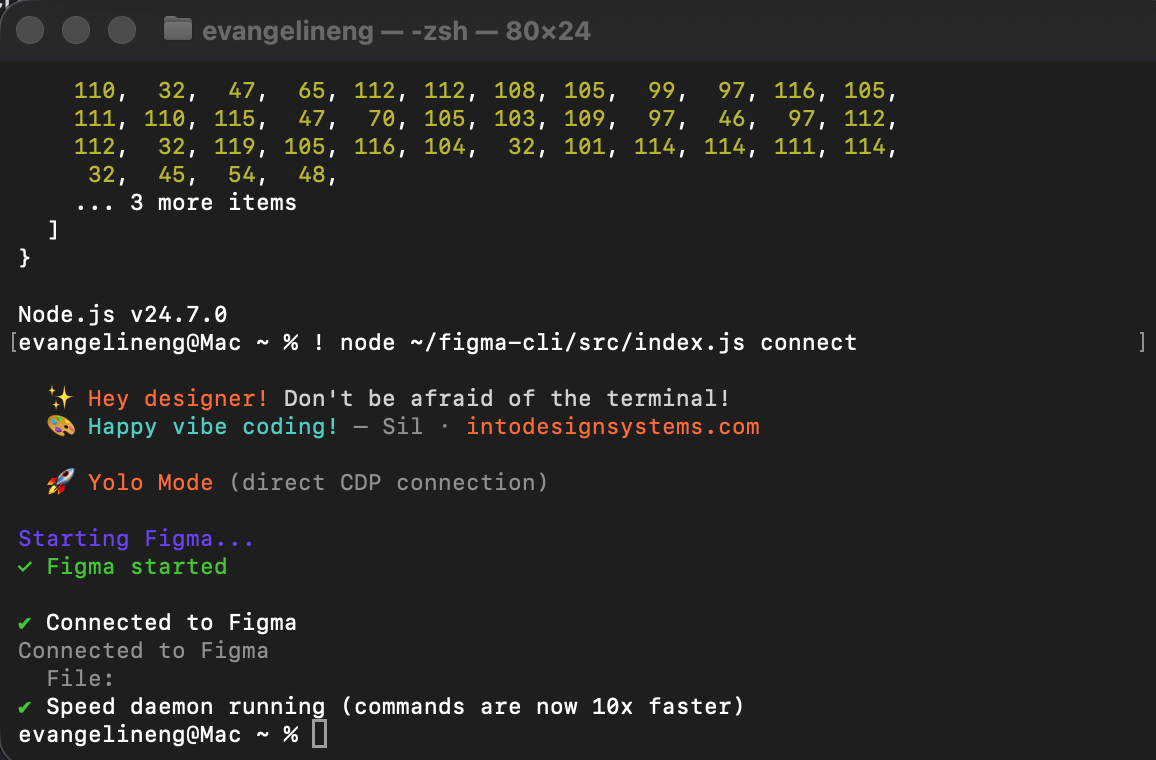
Connected. I can see your open Figma files:
- PortfolioPal Design ← this is the one to use
- Playground
- Introduction to AI Coding Portfolio
- SKILLS PACK
- (+ 2 others)

Should I work in PortfolioPal Design?
I redirected it to the right playground file. It oriented immediately:
Already on the right page — Popa Portfolio Partner
with 61 frames and 125 elements. Let me start
importing tokens now.
Then it read globals.css and tailwind.config.js, created a variable collection, and batch-imported all tokens:
39 variables created. Now visualize the colors
on canvas so you can see them.
Then it started building components. But it rendered something completely unusable.
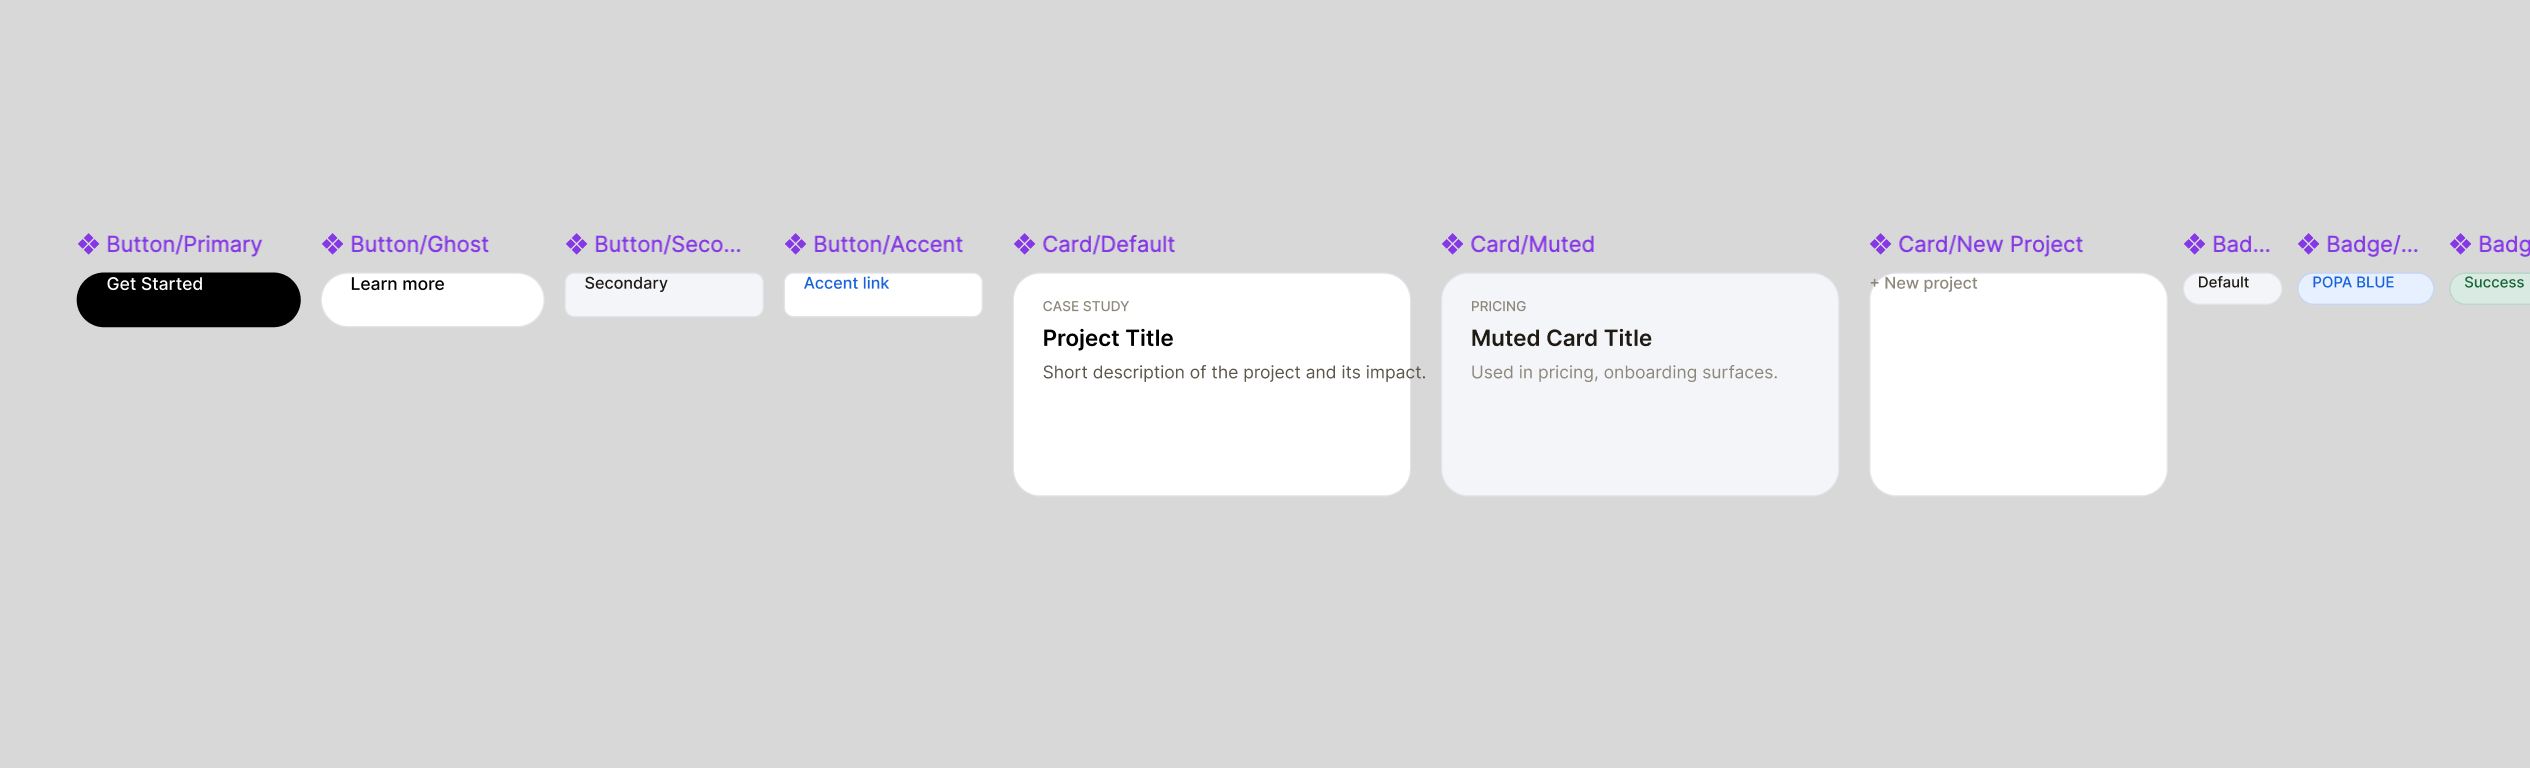
Alright so let’s get started on how do we actually get our code back into figma properly.
Here’s the guide to go from Code to Figma in 7 steps
1. A codebase with design tokens
Design tokens are the named values your app uses. (If you do not have design tokens but a design library in figma, you can convert them to design tokens. I can write up the article if you need, just comment below!)
CREAM = #F4F5F8, INK = #1F1B14, RADIUS_CARD = 22px. They usually live in a file like tokens.ts or theme.js. If your project has a design system at all, you almost certainly have these somewhere.
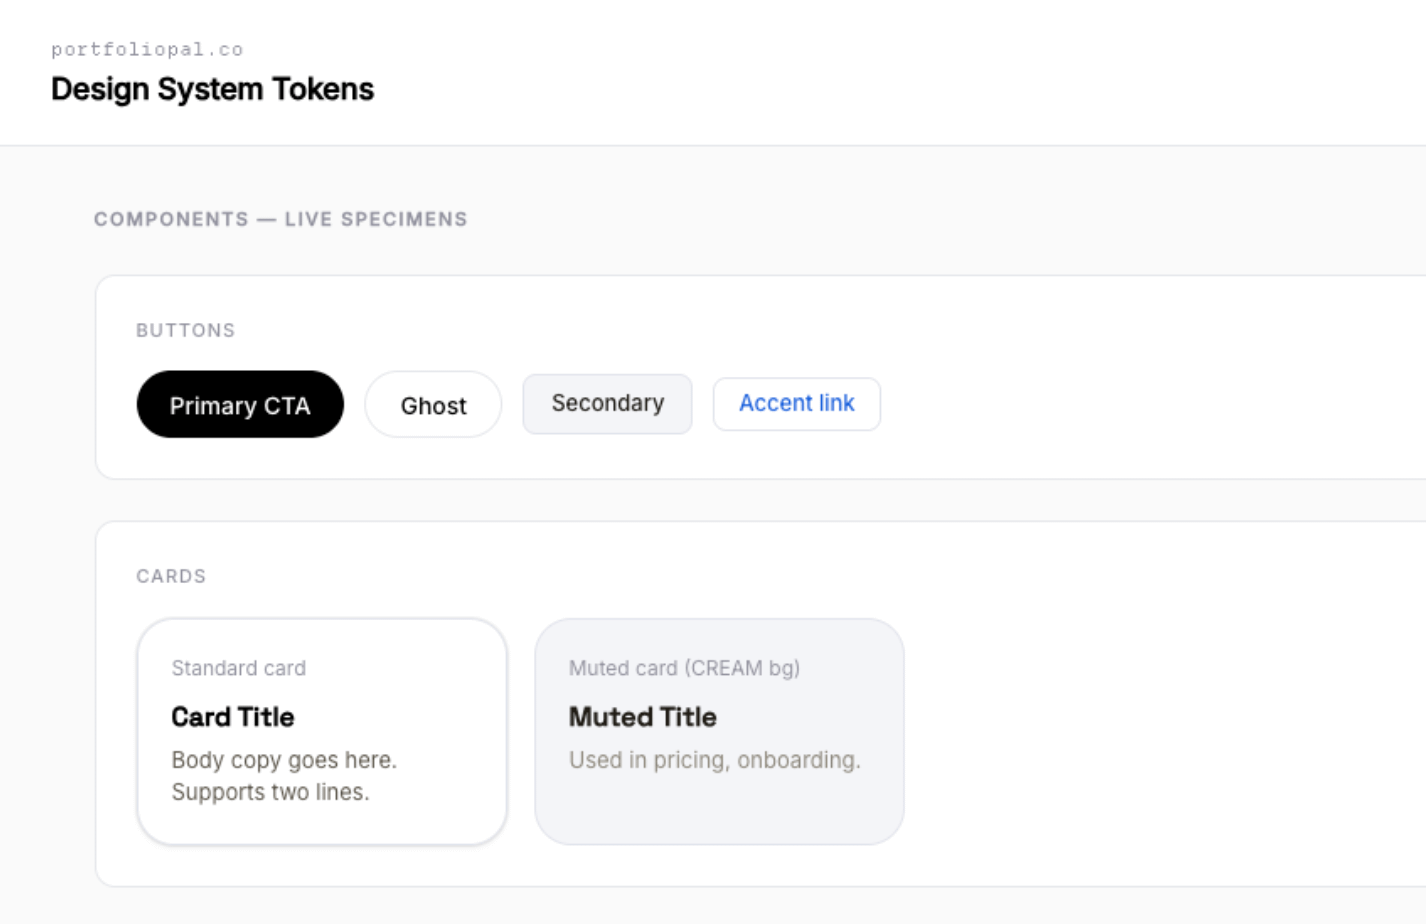
2. Claude Code (or any AI coding assistant)
This is the AI that will write and run the translation for you. You don’t need to understand the code it writes you just need to be able to describe what you want.
3. Figma Desktop open with your file
The tool that does the actual Figma writing needs Figma Desktop running, not just the browser version.
4. figma-cli
This is the translator CLI, a small tool that takes a description of a layout and turns it into actual Figma frames. You install it once via the terminal and then Claude handles it from there.
4.1 The figma-cli Setup
You need:
Figma desktop app (not the browser version)
Claude Code or Cursor
figma-cli:
npm install -g figma-cli, thenfigma connect
The full setup guide is in the figma-cli README. Here’s a video I made that covered the initial setup, this post is about what you do after it’s connected. Youtube Video: How to Let Claude Code Design in Figma
4.2 Why figma-cli and not the Figma AI agent?
The Figma AI agent is excellent for discovery, quick explorations, asking questions about your file. But it runs in the cloud and has a 6-reads-per-month cap per seat on the free tier. That cap will feel fine until you’re mid-session and hit it.
figma-cli runs locally. No rate limits. Each action costs Claude roughly 70–140 tokens versus 256–1,600 for the cloud agent. And because it’s local, it can read your filesystem, your actual CSS files, your config, your component library, not just what’s in Figma.
Step 5: The crucial step! Making tokens agent-ready
tokens.dtcg.json → has the meaning
dev/tokens/page.tsx → has the structure and visuals
figma-use renders both → frames appear in Figma with real content
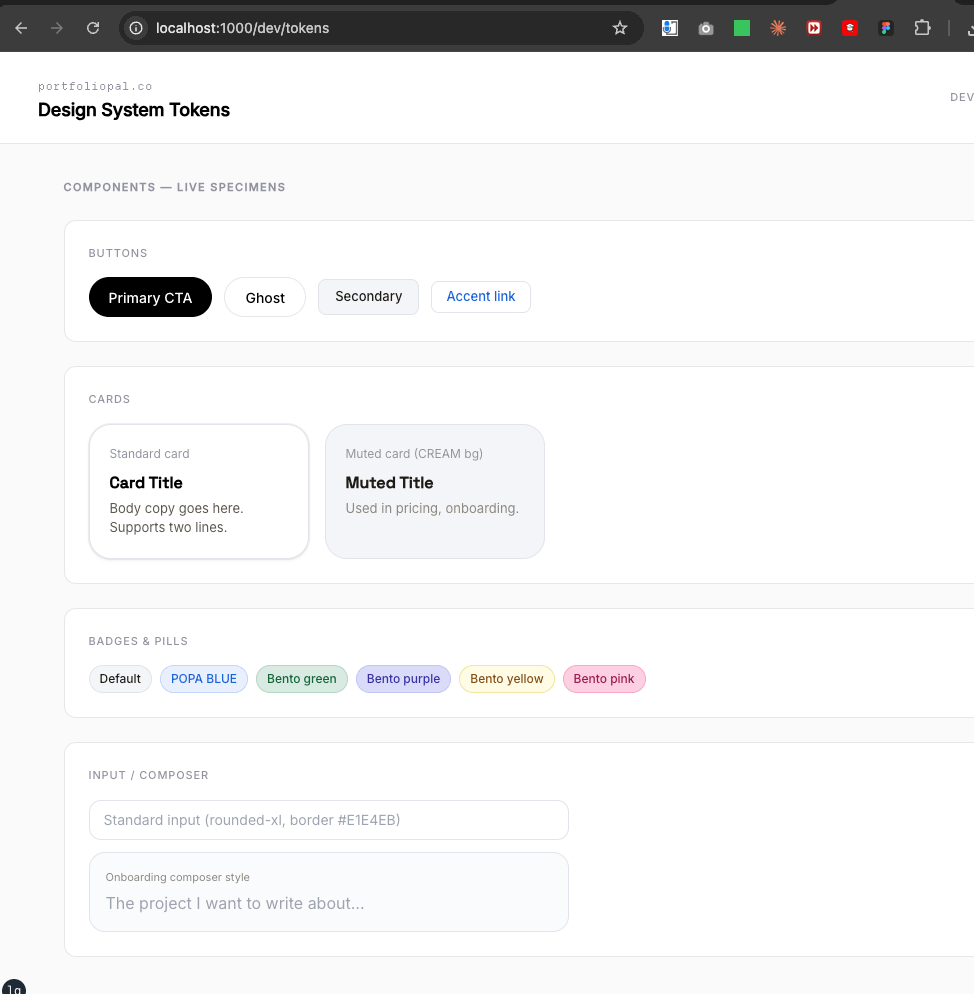
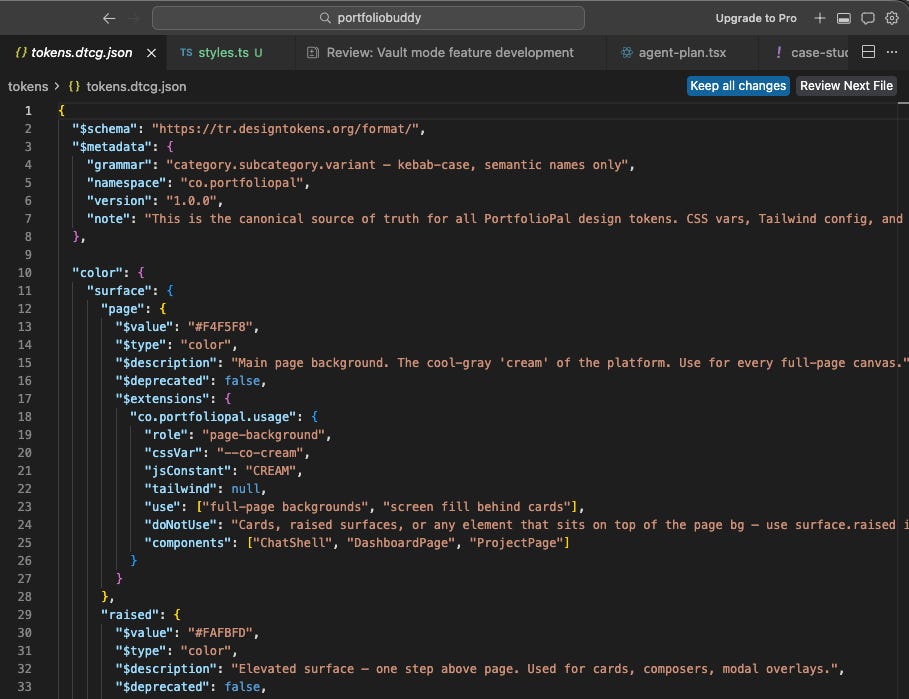
The solution to why it didn’t render properly wasn’t to restructure anything.
It was to annotate the tokens we already had.
The way to do this is a format called DTCG — the Design Token Community Group standard. It’s just JSON with extra fields attached to each token:
$description — what this token IS and what it’s for
$type — is it a color? a size? a shadow?
A custom doNotUse field — when to explicitly avoid it
Here’s what an “empty” token looks like versus an “agent-ready” one:
Before (machine-readable only):
POPA_BLUE = #1863DCAfter (agent-ready):
    “accent”: {
      “blue”: {
        “$value”: “#1863DC”,
        “$type”: “color”,
        “$description”: “POPA BLUE — the sole action/accent color. Links, hover outlines, focus indicators, brand moments. ACCENT ONLY — never a primary CTA background.”,
        “$deprecated”: false,
        “$extensions”: {
          “co.portfoliopal.usage”: {
            “role”: “accent”,
            “cssVar”: “--co-blue”,
            “jsConstant”: “POPA_BLUE”,
            “tailwind”: null,
            “use”: [”hyperlinks”, “hover-state outlines”, “AI suggestion indicators”, “active nav items”, “brand badge text”],
            “doNotUse”: “Primary CTA button backgrounds (use text.primary/#1F1B14 instead). Do NOT use as a page background, card fill, or notification banner color.”,
            “components”: [”Link hover”, “nav active state”, “SelectionPopaBar”, “AiFooter active”]
          }
Same color. But now an AI reading this file knows the intent, not just the hex code.
Step 6: Let it build section by section
Prompt your AI coding agent to use figma-cli to build out the tokens and components in your figma file.
Here’s where the first lesson lives: when don’t try to push everything at once.
The tool that writes to Figma has a size limit. Think of it like a text message with an attachment if the file is too big, it just fails silently. Nothing appears in Figma and you don’t know why.
The fix is simple: break the design system into sections and push them one at a time, especially if you have a huge design system. In our case as an example:
Section 1: Colors
Section 2: Typography
Section 3: Radius & Shadows
Section 4: Components
Section 5: Usage Rules + Spec Reference
Claude handles the splitting automatically once you know to ask for it.
Step 7: Putting the rules inside Figma itself
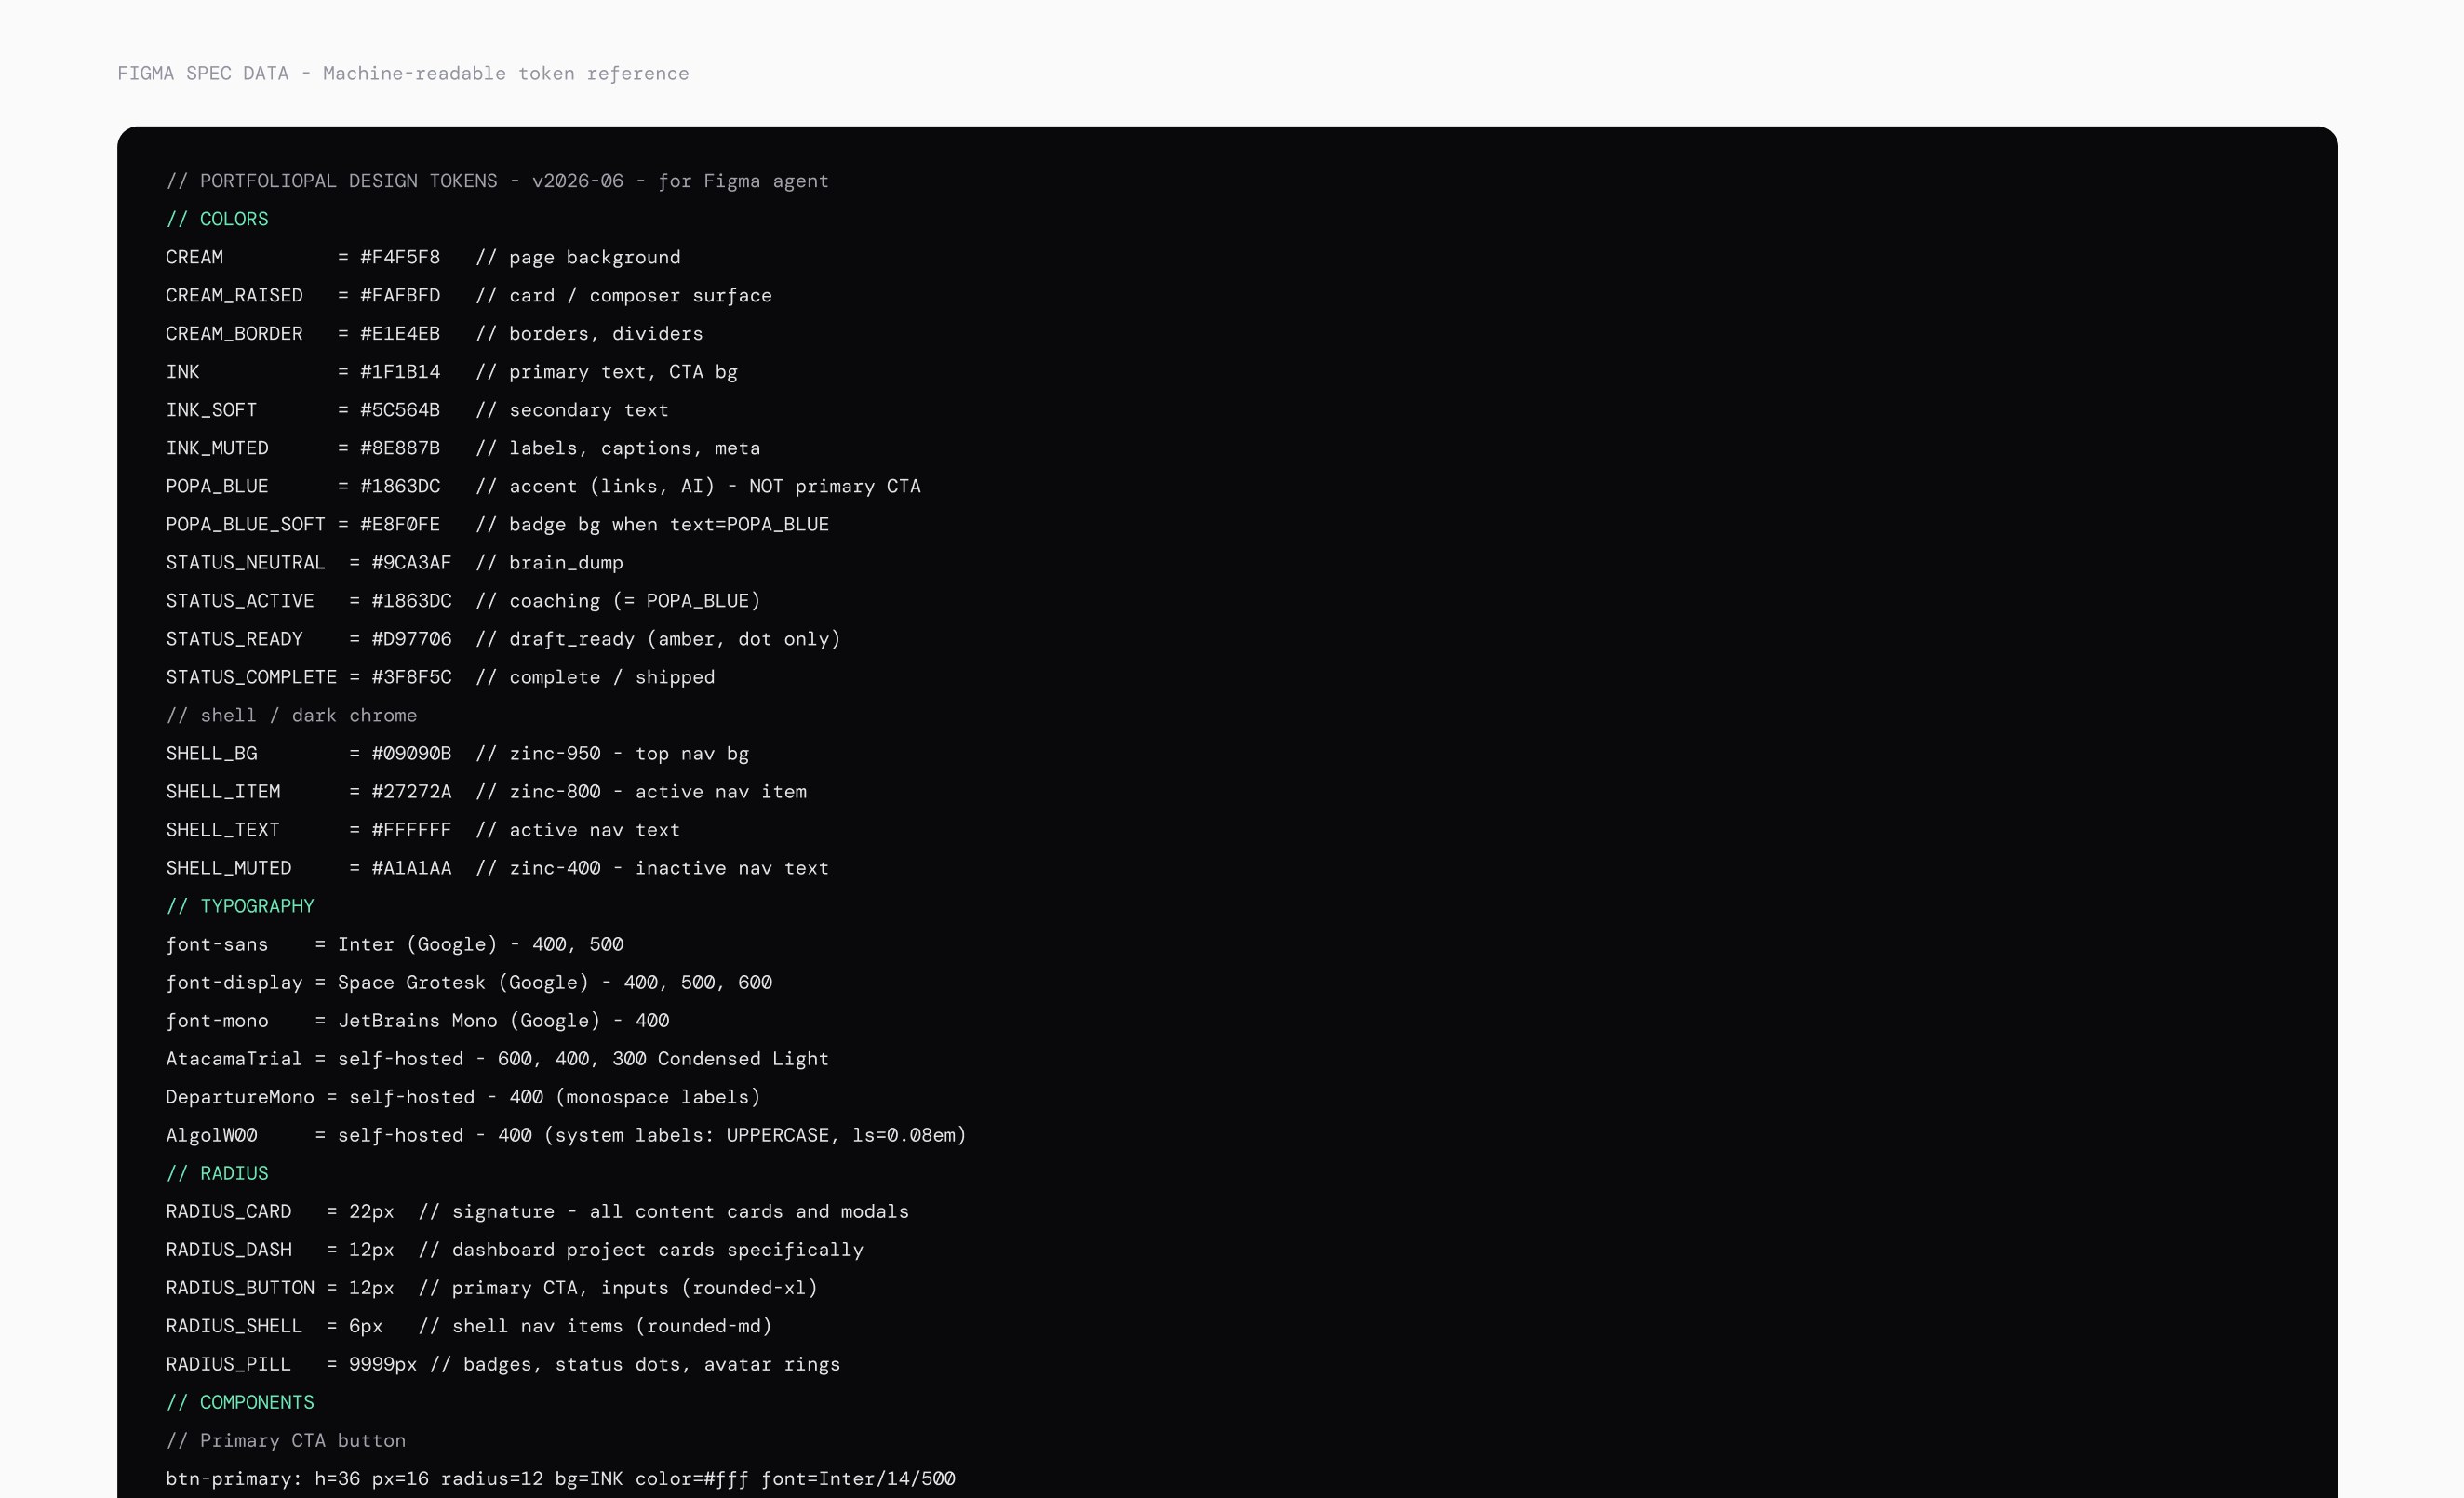
The final step is putting the usage rules directly inside the Figma file.
We added a section called “Usage Rules + Spec Reference” containing three colored callout panels:
Banned patterns (no amber notification banners, no POPA_BLUE as a primary CTA)
Primary CTA rules (always INK #1F1B14, always 36px height, one per view maximum)
Accent color rules (POPA_BLUE is accent only — links, AI states, hover — never a large fill)
Plus a dark code block with the full machine-readable token spec: every name, every hex, every component measurement.
Why does this matter so much?
Because if Figma is where designers work, communicating and ensuring team alignment on the standard is crucial. When a designer opens the file and reaches for POPA_BLUE to fill a button, the rules are right there, not in a separate doc, not in a Notion page nobody reads. When an AI agent reads your Figma file to generate code or reproduce a layout, it finds the rules in the same place it finds the components. The context travels with the design.
This is to ensure that the Figma file and the rules document do not fall out of sync. With it, the design and the rules are one thing.
Note: Make sure to get AI agent to write these rules in figma.
The Result
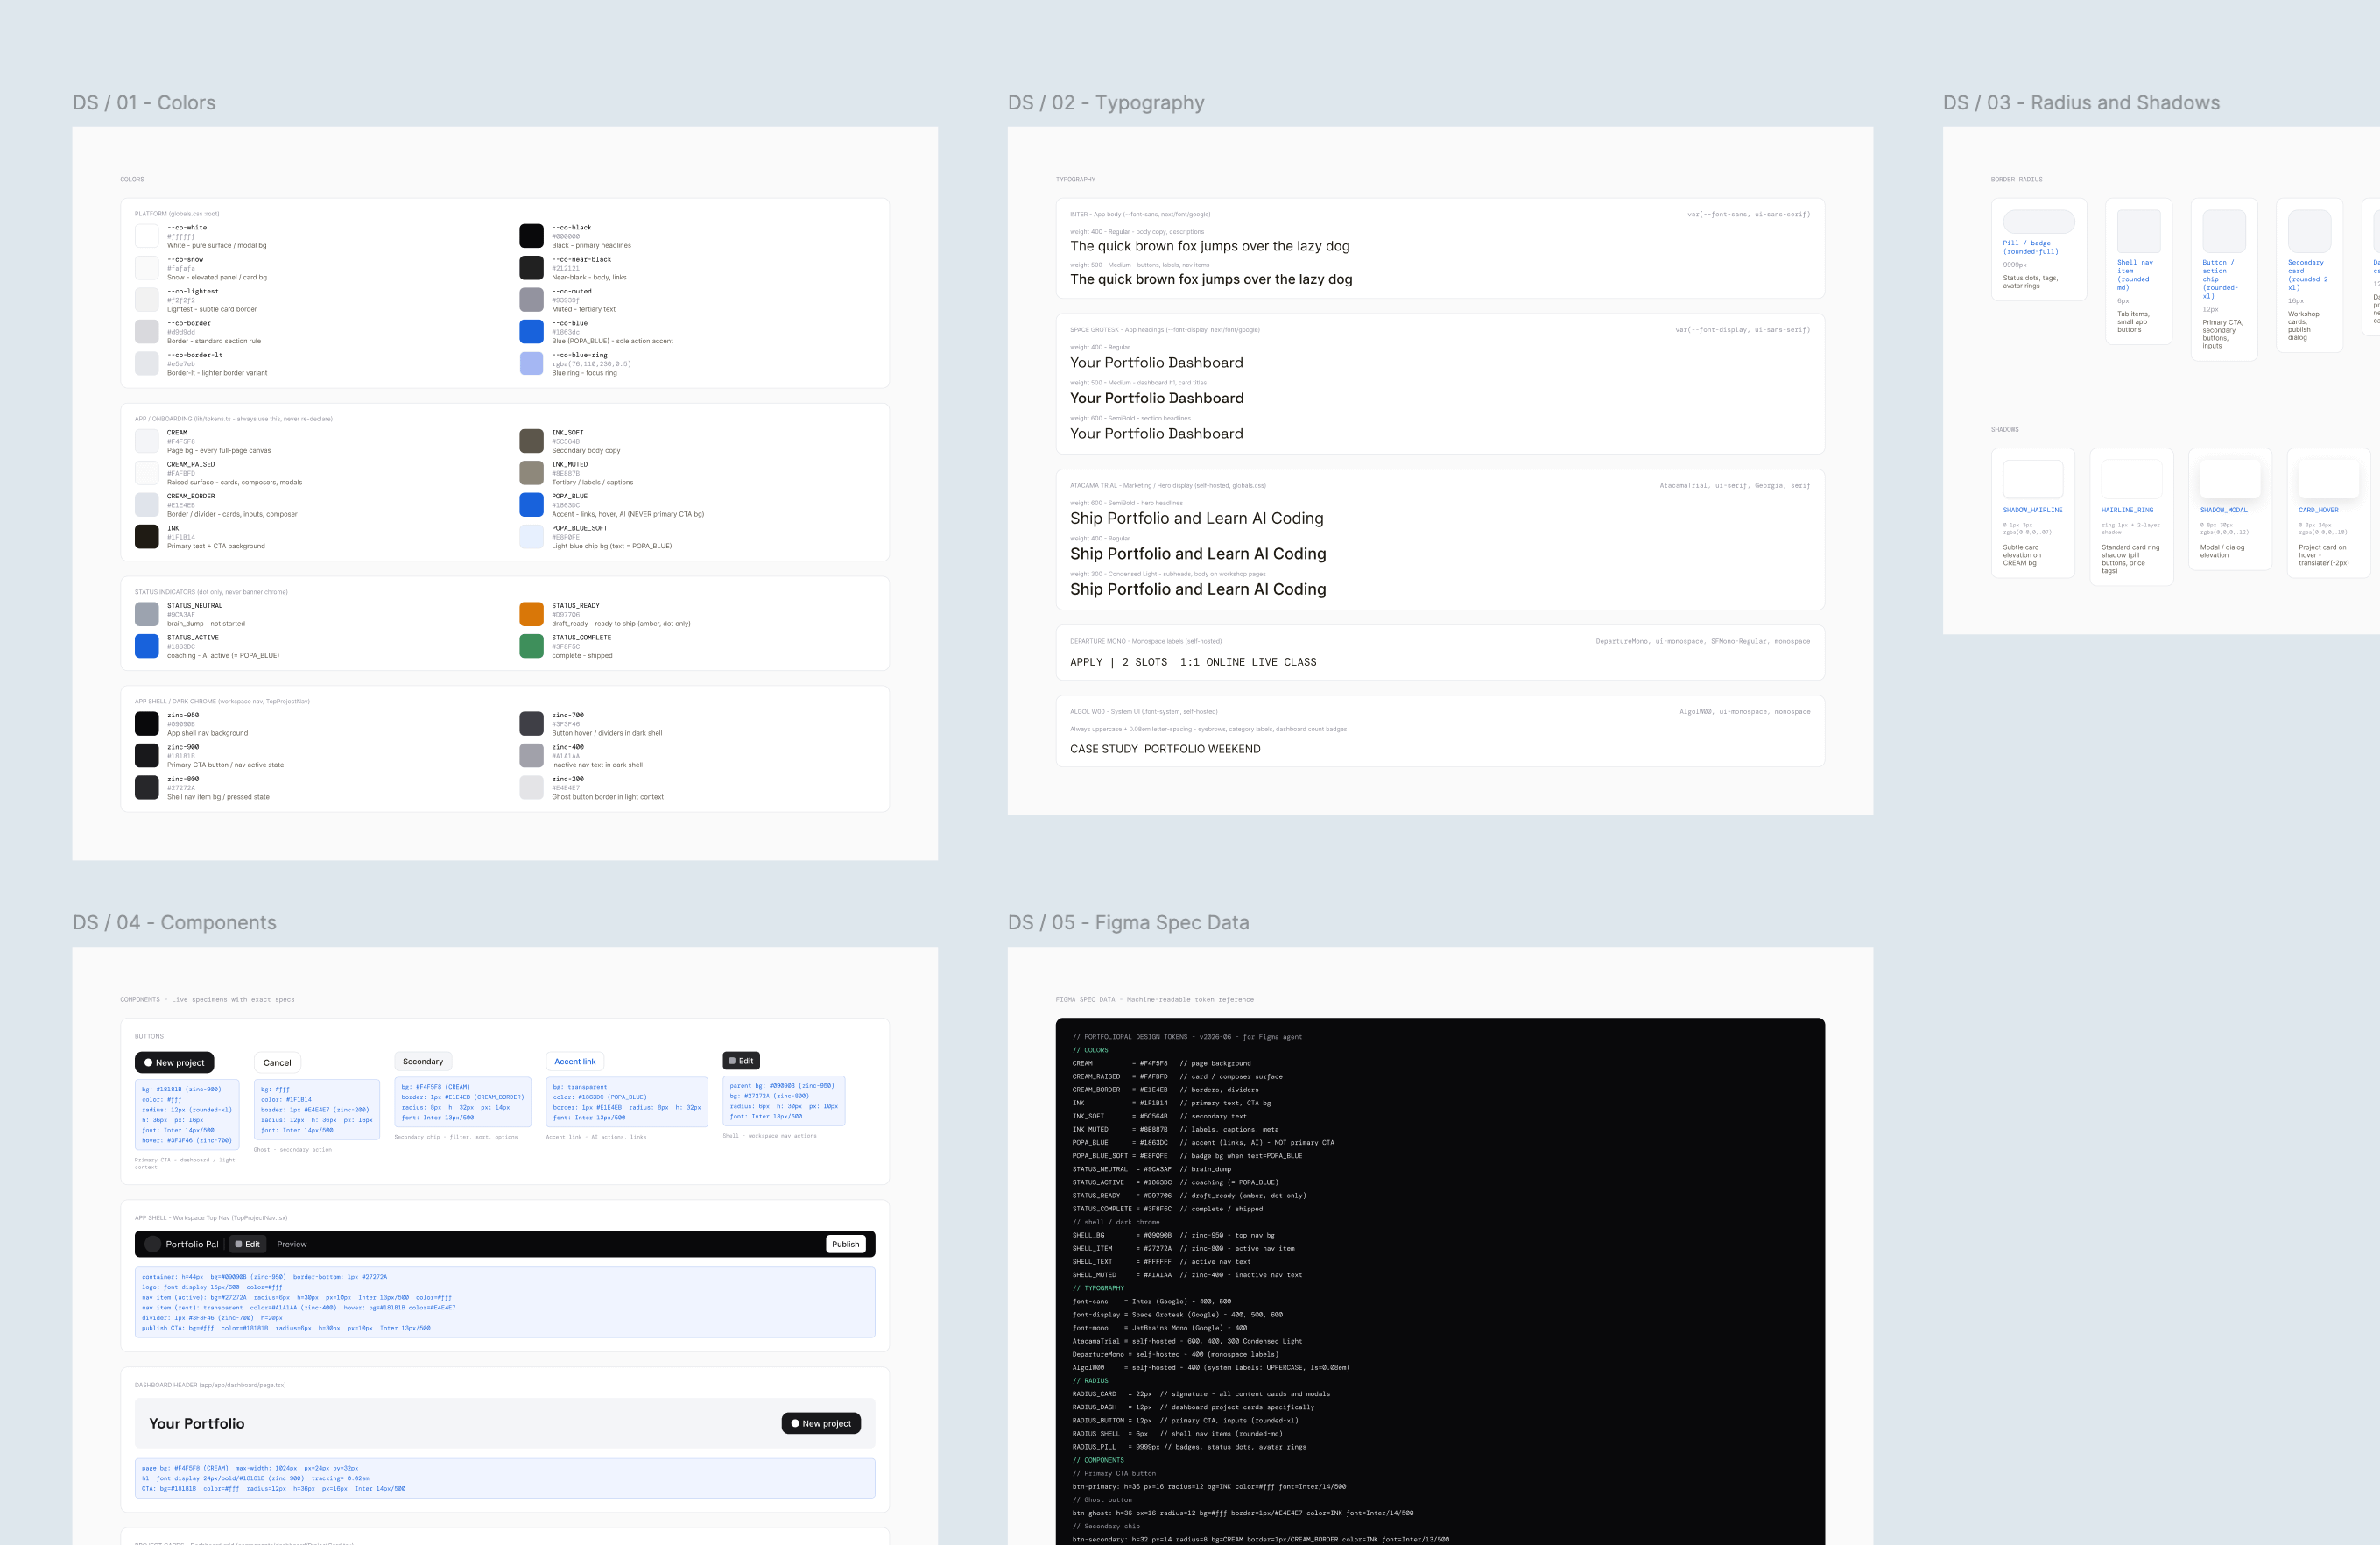
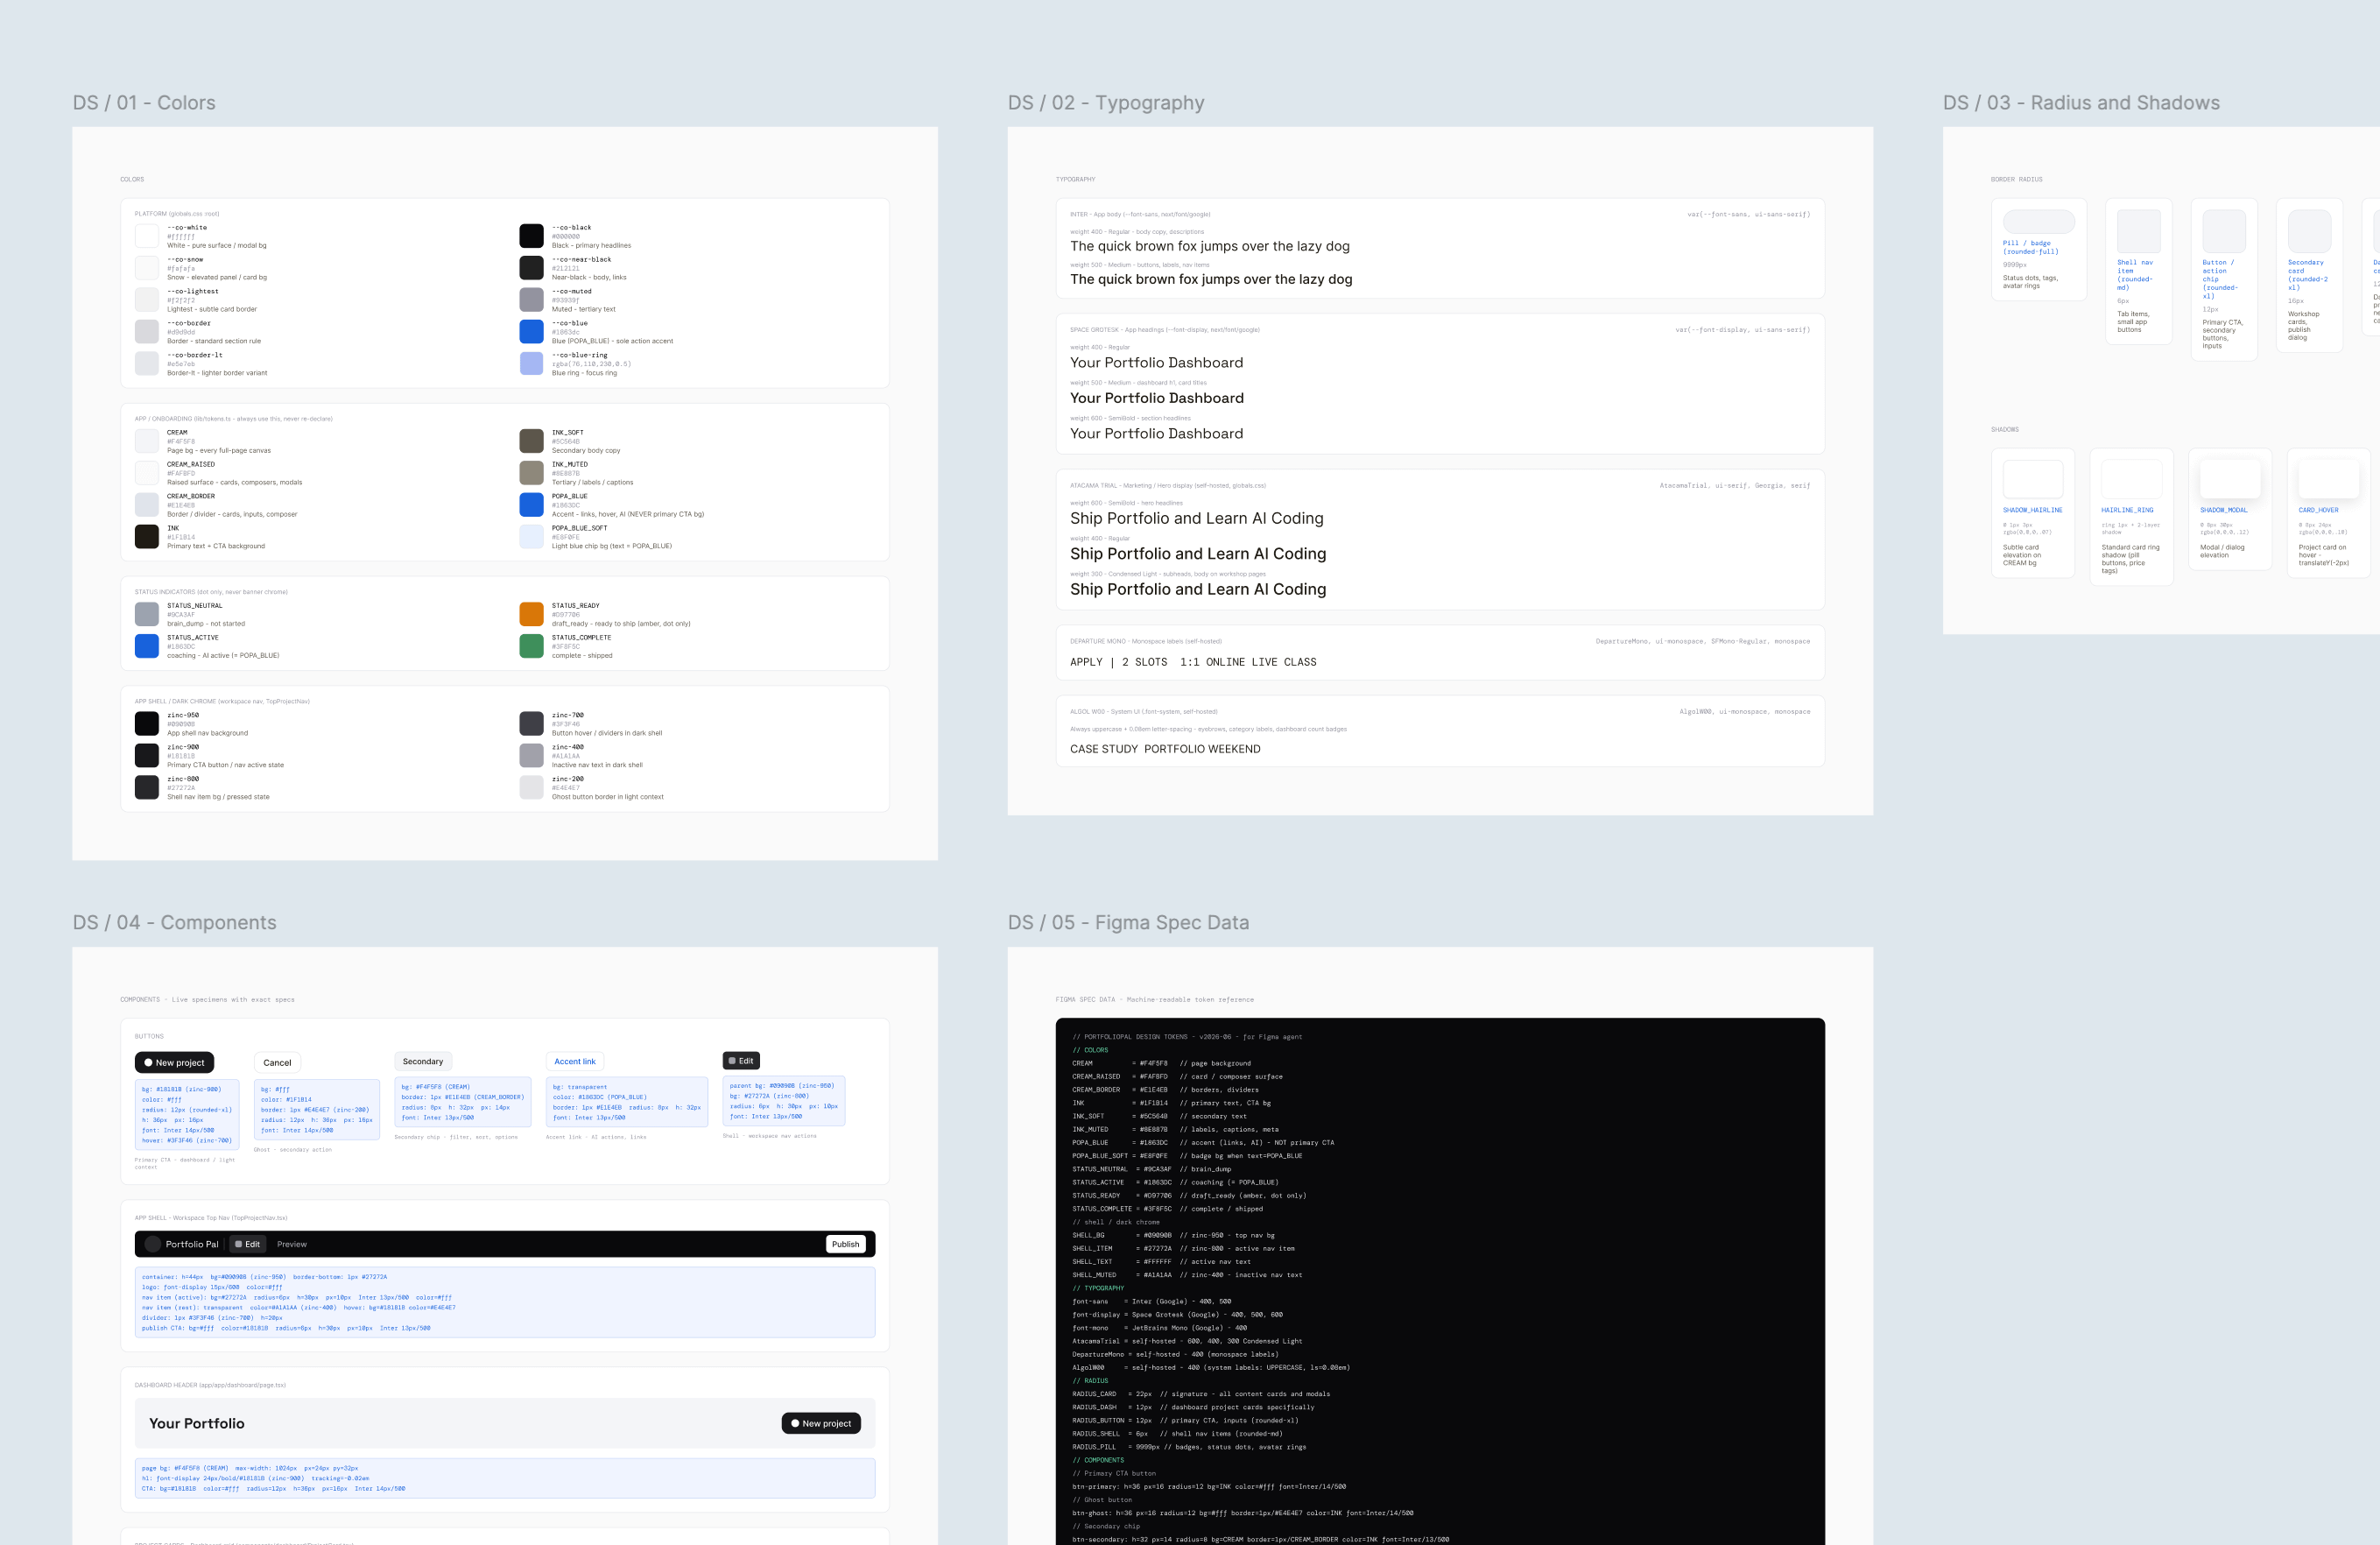
After fixing both layers, the technical tripwires and the semantic gap, five clean sections appeared in Figma:
- Colors: every token with swatches, hex values, and descriptions
- Typography: each font with weight specimens
- Radius & Shadows: visual specimens of every corner radius and drop shadow
- Components: buttons, cards, nav, badges, inputs — with exact spec annotations
- Usage Rules + Spec Reference: what to do, what never to do, and a machine-readable token block
The before image had scattered components and no structure. The after image is a document you can hand to a client, a new team member, or an AI.
A Deeper Dive Into Why The First Try Sucks
The tokens had no meaning attached
This is the more interesting problem, and the one that explains why even when frames did appear, they weren’t useful.
A design token file tells an AI what a value is. It doesn’t tell the AI what the value means.
My token file said POPA_BLUE = #1863DC. But it didn’t say: this is an accent color, it’s only for links and AI interaction states, and it should never be used as a primary button background. Without that context, an AI has to guess. And it will guess wrong.
This isn’t a flaw in the AI. It’s a gap in how most token files are written. A study of 50 real design systems found that only 15 of them included written descriptions for their tokens, and only 1 included explicit “do not use” rules. The rest were just raw value, technically correct, semantically empty.
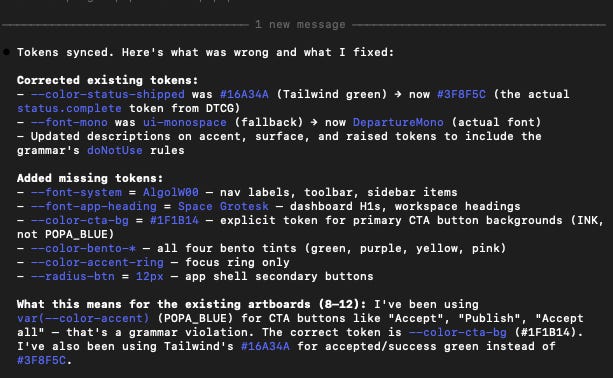
What’s still hard
The setup takes time. Installing the translation tool requires terminal commands. Budget an extra hour if you’ve never done this. Claude can walk you through it.
Silent failures are common. When something doesn’t appear in Figma, there’s rarely an error message. You describe what you see to Claude, it figures out the cause.
It’s not a live sync. You run it when you want to update. Think of it as a fast assistant who can regenerate the whole reference page on demand, not a real-time connection.
The real takeaway
The design system that lives in your codebase is already more complete than most Figma files. It has the real values, the real constraints, the real components. The challenge is that it speaks in code, not design.
Making that translation work well requires two things: tools that don’t crash on your data, and tokens that carry enough meaning for an AI to use them correctly. Get both right, and the round trip from code to Figma becomes something you can actually rely on.
Where Design<>Code is headed
Design handoff has been a problem for as long as design tools and code have coexisted. Plugins and Storybook tried to solve it.
None of them fully worked because the problem isn’t process, it’s translation. Someone (or something) needs to read code and understand what it means for a design system. Claude Code can do that now.
The round-trip isn’t a workaround. It’s a new direction of work, and it doesn’t matter which canvas UX we use to design, it could be Figma, Paper etc. We need a way to design freely while ensuring it is 1:1 with code.
Resources & Artifacts
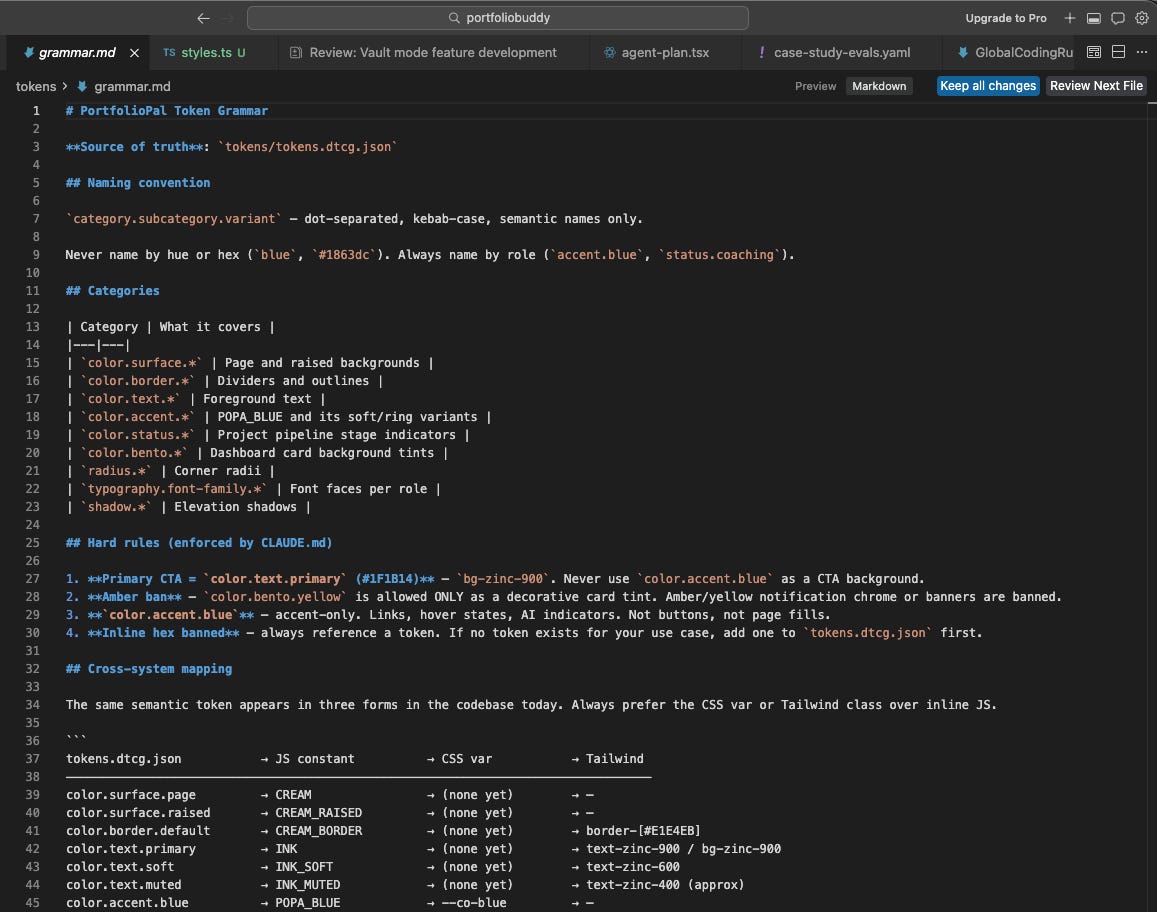
grammar.md
Includes cross-system mapping: “the same semantic token appears in three forms in the codebase today. Always prefer the CSS var or Tailwind class over inline JS.”
tokens.dtcg.json → JS constant → CSS var → Tailwind
tokens.dtcg.json → has the meaning
dev/tokens/page.tsx → has the structure and visuals
figma-use renders both → frames appear in Figma with real content
Figma Spec Data explaining why putting rules inside Figma that allowed it to translate from code to figma well.
What is DTCG?
DTCG stands for Design Token Community Group — a working group under the W3C (the organization that sets web standards). They created a standard way to write design token files so that different tools can all read them the same way.
Before DTCG, every tool had its own format. Style Dictionary used one JSON structure, Figma Tokens used another, Tailwind used JavaScript. They all stored the same information but incompatibly.
DTCG’s format adds a simple rule: every token gets special fields prefixed with $ — $value, $type, $description. The $ signals “this is metadata about the token, not the token itself.” Tools know to look for these fields.
What is CLI?
A Command Line Interface (CLI) is a text-based user interface used to interact with computer operating systems, programs, or cloud services by typing commands rather than using a mouse.
6 Min Explainer of CLI for AI Agents (for beginners)
Hello I’m Evangeline Ng! I experimented on this workflow and I hope the findings are helpful.
Introducing 1:1 Course AI Code Your Design Portfolio 🥳
Thanks for supporting and reading the guides, I build at the intersection of AI & design!
I’m hosting 1:1 AI-coding design sessions to ship your highly crafted portfolio. Come in with saved inspirations and your designs. At the end of the sessions, you’re equipped with the full AI-coding workflow and a live custom portfolio site you’re proud to apply jobs with.
If you want to build an AI-Native Portfolio, you can register for a spot on: https://www.portfoliopal.co/portfolioweekend ☻
I’ll review and reach out to you through email if there’s a great fit between us :)
It’s not new that every week there’s a new “must-learn” tool, a new reason you’re “supposedly behind”. But most of us are busy with day jobs, solving real problems, and figuring things in our busy lives. Subscribe to my substack and let’s experiment weekly.
I got you. If you’ve been quietly collecting curiosity but lack time, this is our space to get the latest updates without the pressure.
We’ll start with small experiments we can actually build momentum from :)